
If students are rostered through Clever or Classlink they should NOT be manually rostered. Please reach out to the GSB team to run a sync.
Invite Users
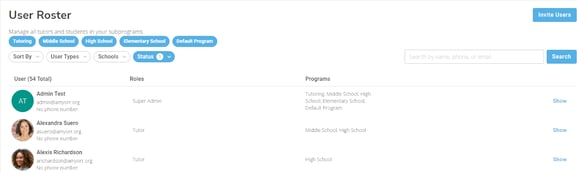
Administrators can invite users individually or in bulk to their ecosystem by navigating to the Admin Panel > Users > User Roster.
Administrators can invite new users to the platform by clicking the blue “invite users” button in the top right corner of the User Roster page.
After clicking the blue “invite users” button, an admin will see the form below. Fill in the left side to add a single user..
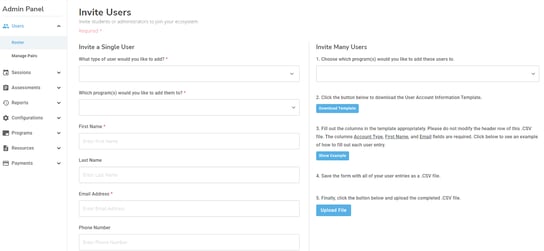
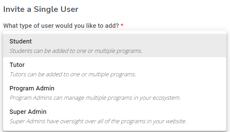
- Use the drop-down arrow to select the type of user your would like to add
- Select the program you would like the user to join (if there are multiple programs in your platform). If your platform only has one program, select that program
- Use the appropriate boxes to enter the user’s first name, last name (optional), email address, and phone number (optional).
- Determine if you would like to autogenerate a password for the user, or send them invite.
- Users with autogenerated passwords will receive an email with their login credentials. The same email will also be sent to the administrator who invited them. The user will immediately be in the "active" status.
- Users without and autogenerated password will receive an invitation to the platform and will remain in the "invited" status until they have accepted the invite and set up their password after-which they will be moved to the "active" status.
- Click the blue “submit” button at the bottom of the left side to finish your invitation.
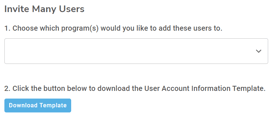
Invite Many Users in Bulk
Administrators can invite many users at once using the bulk invite users feature.
- Select the program you would like the user to join (if there are multiple programs in your platform). If your platform only has one program, select that program
- Click the blue “download template” button (as seen below on the left) to generate a CSV form (as seen below on the right)
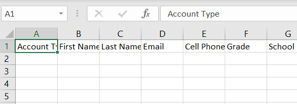
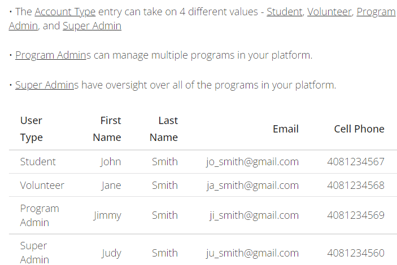
- Fill out the required fields in the CSV form as shown in the example below. Do not change any headers
- Tip: This document will download as a .csv (coma separated value) file. It may be easier to save this file as an excel file if you use Microsoft or upload to Google Drive as a Google sheet so that you are able to fill in the rows as needed. Once you have completed filling out the document; you can save it as a .csv file to upload it to the platform.

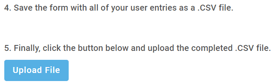
- Save the form.
- Select autogenerate passwords if you would like to autogenerate passwords for these users. Users with autogenerated passwords will receive an email with their login credentials. Administrators inviting users with autogenerated passwords will also receive an email with a csv file listing user information and their passwords.
- Leaving the autogenerate passwords bock unchecked will send an invitation email to the user and the user will be in "invited" status until they have accepted the email invitation and set up their account.
- click the blue “upload file” button to invite these users
Tip: We suggest autogenerating passwords for users as this is the most efficient way to get users invited and all set to start using the platform!